Her new family includes her husband Ryan and his daughter Cherokee.

This is my absolute favorite picture so far from the wedding. My husband, Drew, dancing with his little princess.


I belong to the Yahoo group, WhoDuKnit. They have a blog where contests are posted for members to try and solve mysteries. I solved the mystery of Did Bob Kill Pat? and was the lucky winner of the prize draw.
I chose the soap felting kit. The kit includes everything needed to felt the soap. I will post another picture after i actually do it.
Thanks, Jane!
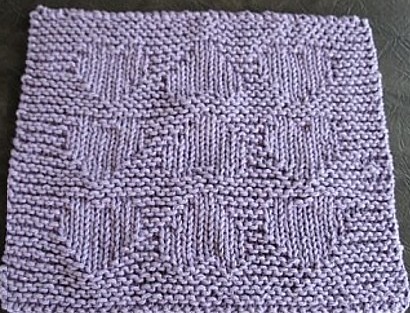
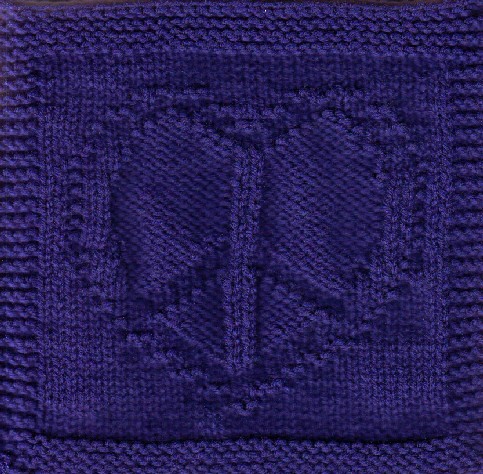
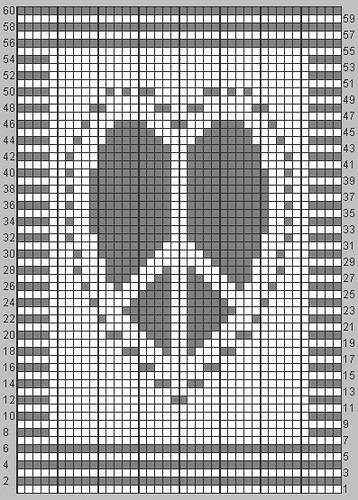
Lots of Love in these sweet little hearts. Wouldn't they look cute in an afghan?
Sample knitted by Marie.
Get the pattern at:
http://knitalittlestore.blogspot.com/2008/06/baby-hearts-free.html
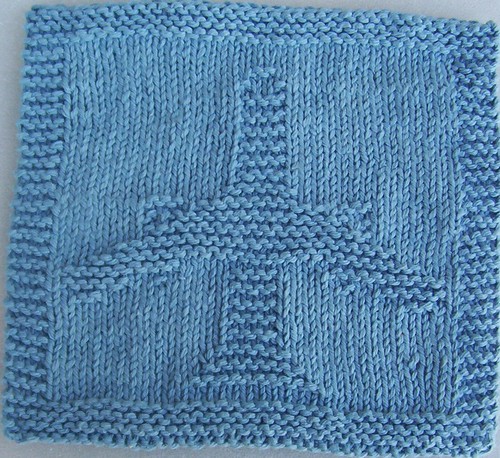
Leaving on a jet plane....
Perfect for your favorite airplane enthusiast.
The sample was knit by Esther.
Get the free pattern here:
http://knitalittlestore.blogspot.com/2008/06/airplane-free.html
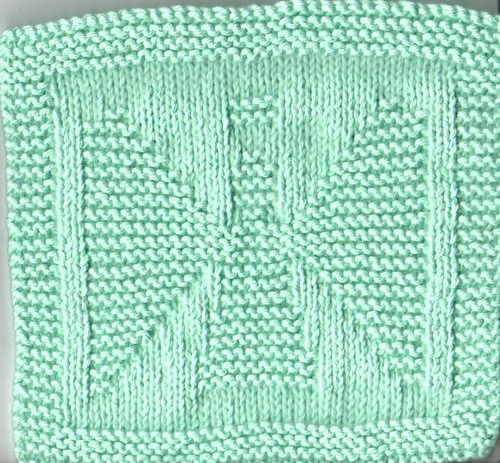
An Angel to watch over you and the ones you love.
The sample was knit by Lynne.
Get the free pattern at
http://knitalittlestore.blogspot.com/2008/06/guardian-angel-free.html
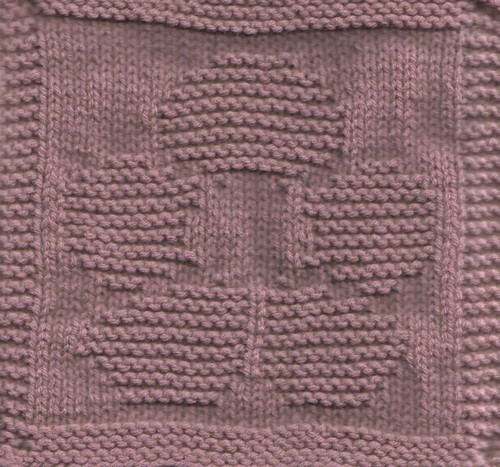
I hope you enjoy the free pattern for Flower Power. I used to ride the schoolbus to school with a girl that every day, even in winter, would bring the bus driver a flower. Every day, as she handed him the flower, she would say Flower Power. I don't remember anything else about her, not even her name, but she was the inspiration for this pattern.
The free pattern for Flower Power is at:
http://knitalittlestore.blogspot.com/2008/06/flower-power-free_02.html

Want to try illusion knitting? This pattern will walk you through it step by step.
Pattern available free at
http://knitalittlestore.blogspot.com/2008/06/checkerboard-illusion-tutorial.html

I am offering the Brick Patio as a free pattern at my Knit A Little Store.
http://knitalittlestore.blogspot.com/search?q=brick+Patio
Thanks to Jami for knitting it up and finding the errors.

I designed this pattern after the West Virginia Coal Mine disaster. It would work for any miner or spelunker. It is available as a free pattern at my Knit A Little Store.
http://knitalittlestore.blogspot.com/search?q=Miner%27s+Guardian+Angel

I finished the first camel!
The others need to be stitched together, but are already knit.
As with all the figures there is a LOT of sewing to do. Sewing takes me a LOONNG time.
The camel is an Alan Dart pattern from the book Irresistable Gifts To Knit and is part of the Noah's Ark pattern.
There is a second camel in the book which is part of a Nativity set. That Nativity set is a new one, not his older Nativity pattern which I hope to someday acquire.
I made several changes to the pattern.
First, I knit it with two strands of Caron Simply Soft on size 9 needles.
Next, I thought the body according to the pattern was too deep so cut out four rows of plain stockinette in the body. I also cut out four rows of stockinette in the neck to keep it in proportion with the body.
I also cut out two rows of stockinette in the head
I thought the legs seemed a bit short so added four rows to the first leg section. I cut out one knee row so did the decreases as p2tog. I added three rows to the last leg section. I did not put anything but stuffing in the legs. The camel stands fine if stuffed tightly.
I used 12 mm plastic safety eyes for the eyes. I use a pair of pliers to squeeze the back on tightly. If you use pliers be sure to protect the eye surface from scratches with a cloth.
The ears are according to pattern. The tail is different. I used one strand of Caron Simply soft and size four needles to knit a three stitch I-cord. I added a couple bits of yarn for a tassle at the end and fluffed them by running my needle through the strands to separate them.
I did not add any facial features besides the eyes. I like her as she is.
The Wise Man is from Jean Greenhowe's Nativity in Christmas Special.

This is my first time knitting a Fuzzy Mitten pattern. The lamb is free at
http://fuzzymitten.com/
I had enough yarn left from the Baby Surprise Jacket to make the lamb. The plain purple is Red Heart acrylic. I used safety eyes.
Safety eyes are harder to put on than I thought. I had to use pliers to snug the backing down well enough. If you do that be sure to protect the front surface of the eye from getting scratched by the pliers.
The design allows for the arms and legs to move to different positions.
I have been in contact with Barbara Prime of Fuzzy Mitten Toys and she has given me permission to knit and sell some for charity. I want to the proceeds to go to Heifer International.
http://www.heifer.org/

I have finally gotten around to getting a pic of the Baby Surprise Jacket from Spun Out Designs, http://www.schoolhousepress.com/spunout.htm , I finished early this year. The original pattern is by Elizabeth Zimmerman.
I made a LOT of changes. The yarn is a fuzzy, bulky acrylic that I lost the labels on long ago. I meant to document the changes but never did and I could not begin to tell you exactly how the changes were made.
I decided I wanted it to be a pullover instead of a cardigan. I also wanted a two button placket at the neck to help with getting it on and off.
I lengthened the sleeves and added a wide band of ribbing at the wrist that can be turned up or down. I also added ribbing to the bottom of the sweater.
I added the hood from the Tomten Jacket, also by Elizabeth Zimmerman.
Lastly I added a handwarmer pocket on the front.
I think it is at least a size three. I have not had little ones around for a while.
We have a wedding coming up in September when my step-daughter is marrying the intended recipient's father.
Little C is seventeen months old now.

The Second Book of Modern Lace Knitting by Marianne Kinzel. LOTS of wonderful patterns in this one. I especialliy like the Daffodil.
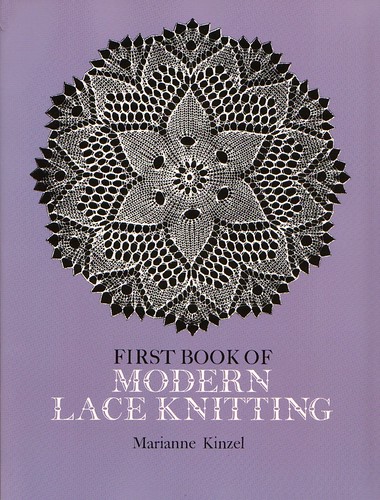
I went on a binge and bought two new books. They are both by Marianne Kinzel. This is her First Book of Modern Lace Knitting.
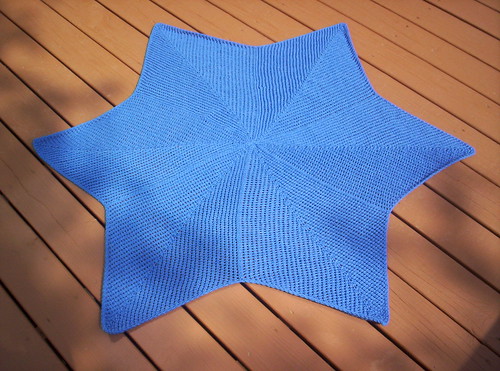
Lace Star Cloth Knitting Pattern
Lion Brand Pound of Love in Denim color
Size 7 knitting needles
I was inspired to knit this baby blanket by this post on Linda's blog, Dances With Wools.
The original pattern can be found here.
The original pattern is gorgeous and I followed the basic pattern.
I did change a few things.
Instead of SSK, YO I did K2TOG, YO.
My reason for this was that I did not want the two sides of each point to appear identical. I wanted to achieve the play of light you can see in the photo so that each point had a dark half and a light half when light hit it. I achieved my goal quite nicely and am very pleased with the result.
The other thing I changed was the edge. My edge is two rows.
The first row is P2TOG all the stitches that would have been K2TOG, the YO's stayed the same.
The second row I knit all the P2TOG stitches and purled the YO's.
For the bind-off I was really worried about running out of yarn so decided to try my own idea. I knit 1, slipped 1 as if to purl, then passed the knit stitch over the slipped stitch. I continued thisall the way around.
Since my yarn was acrylic, I did not have to worry about the bind off being stretchy as my blanket would never be blocked,
All mine got was a quick run through the washer and dryer. It came out just the way you see it.
If the original pattern were extended, I would have worked it to row 92.
If you knit this you may want to spread out each section every now and then to check for errors. I frogged 16 rows once because I simply did not see an error. It was not a big one, and I am not sure exactly how I made the mistake, but once I saw it, it glared at me till I redid it.
Final measurements are 28" from center to tip of point and 19" from center to edge between points.
I think it will make a good baby or lap blanket. It does not yet have a special someone to go to.
Oh, and in case you are interested whether my worries about running out of yarn were valid, I had 63" of yarn left at the end.
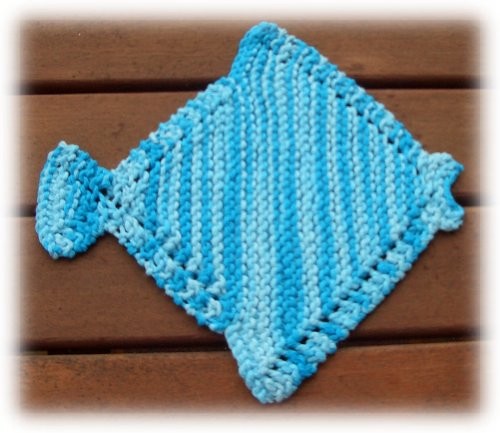
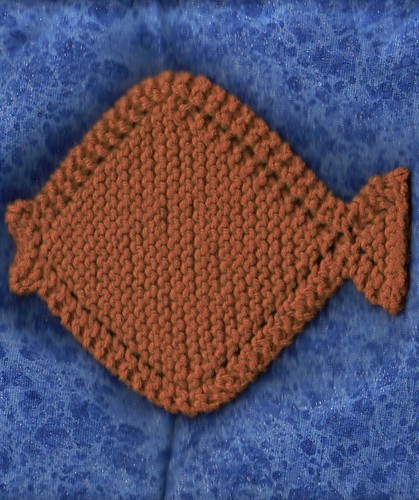
Alli, of Knitwit's Heaven Fame, added fins to Bubbles. I have given her permission to post the pattern and am also posting it here :)
Bubbles With Fins
Materials:
One ball of cotton or acrylic yarn (variegated or solid)
size (4.5 mm) 7 US needles
Stitches Used:
K = knit
p = purl
yo = yarn over
k2tog = knit 2 together
Cast on 8 stiches
Knit 2 rows.
Bind off 2 stitches, k1, yo, knit to end.
Repeat bind off row once more.
K2, yo, knit to end of row.
Repeat till 40 stitches on the needle.
Next 2 rows: bind off 7 stitches, k1, yo, knit to end.
Knit 2 rows.
Next: k1, k2tog, yo, k2tog, knit to end.
Repeat this row until you have 4 stitches left.
Then k2, yo, k to end each row till there are 14 stitches on needle.
Bind off and weave in ends.
Thank you Alli!!!

My book came! I had to order it from the publisher, but it is finally here.
I had heard it was available in Borders and Barnes and Noble but not in my stores. ISBN is 1-858702-70-4 if you want to try.
If you want to get it from the publisher, here is the link. I tinied it as it was way long:
http://preview.tinyurl.com/4wmkx2
I can imagine knitting a LOT of these patterns!
My favorites are the farm, Noah's Ark and the Nativity.
There are 50 patterns in all.

I have added a free pattern for the Bag minder to my store. Find the free pattern here:
http://knitalittlestore.blogspot.com/2008/04/bag-minder.html
The mesh is actually quite a pretty pattern and very easy to do. The pattern requires knitting on either double pointed needles or 2 circulars, size 10 1/2 and uses any worsted weight yarn.

Sweet!
Copyright © by Susan Mrenna 2007 Knit A Little http://www.knitalittlestore.blogspot.com/
Sample knit by Ang.
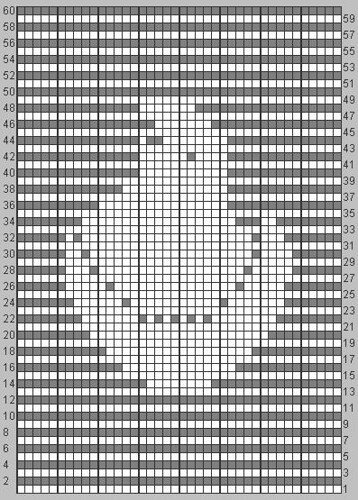
One ball of cotton yarn, size 7 needles Cast on 40 Stitches K = knit, p = purl.
Row 1-13 and all odd rows) knit all stitches
Row 14) k16, p8, k16
Row 16) k13, p14, k13
Row 18) k11, p18, k11
Row 20) k9, p22, k9
Row 22) k8, p7, (k1, p1) 4X, k1, p8, k8
Row 24) k7, p6, k1, p11, k1, p7, k7
Row 26) k6, p5, k1, p15, k1, p5, k7
Row 28) k6, p3, k1, p18, k1, p5, k6
Row 30) k6, p2, k1, p20, k1, p4, k6
Row 32) k6, p1, k1, p21, k1, p3, k7
Row 34) k8, p19, k3, p2, k8
Row 36) k10, p16, k14
Row 38) k13, p13, k14
Row 40) k15, p11, k14
Row 42) k15, p6, k1, p4, k14
Row 44) k15, p1, k2, p8, k14
Row 46) k17, p7, k16
Row 48) k15, p7, k18
Row 50-60) knit all stitches
Bind off and weave in ends.
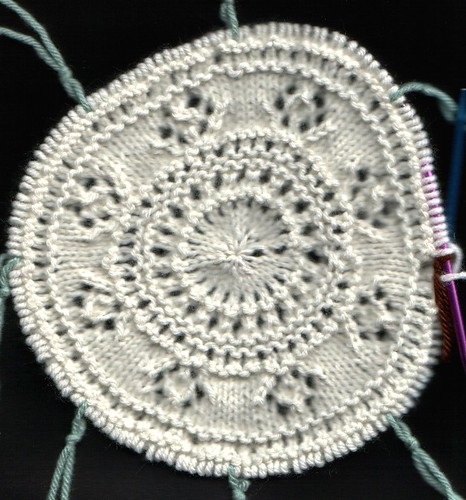
March 14 is known as Pi day. To celebrate at 3:14 this afternoon I cast on a Pi shawl in the Orkney Pi pattern.
The Orkney Pi is a KAL with the EZ as Pi Yahoo Group, http://groups.yahoo.com/group/EZasPi/
I am using Lion Brand Pound of Love in the color Antique White as mine will be a blanket rather than a shawl. I used a waste yarn I-cord cast-on that I have already removed the waste yarn from and closed the hole.
I have done the first two rows of the Tree section.
I followed Bonnie's idea of adding a few extra rows as she said in message 25304 on the EZ as Pi group.
My piece is distorted by the needles not holding it perfectly round, but really is okay.
For more on Pi Day see http://www.piday.org/

The dog is from the Jan Messent Book, Knit A Fantasy Story.
I did make a few changes. I did not use a frame to build the dog on. (This will make sense if you have the book)
I also changed the legs. For the front legs I cast on twelve stitches and knit twelve rows of garter stitch and cast off. I rolled the legs tightly with the cast on and cast off edges being the top and bottom of the leg. Then I stitched the roll edge to the rest of the leg and then stitched it to the body.
For the back legs I cast on twelve stitches and knit six rows. On the seventh row I k2, kfb across, then knit five more rows and cast off. Finish like the front leg and the thicker end is the top of the leg.
I don't know if I just missed them but I could not find directions for a tail. I made mine by casting on four stitches and knitting I-cord for three rows. Then I k2tog, k2 on the fourth row. I knit the three stitches in I-cord for three more rows, then k2tog, k1 on row eight. I knit the two stitches in I-cord for three more rows, the k2tog and cut the yarn and pulled the end through the loop and wove it in. It made a pretty good tail.
So far the chickens and dog have been pretty close to the scale of the Jean Greenhowe figures for the Nativity. I may manage to finish the horse tomorrow.

The chickens are from my new book purchase, Jan Messent's Knit A Fantasy Story.
I LOVE chickens. I don't collect them or anything, but I do love them.
I think that there were probably chickens around the stable. I made six, but only put three in this picture.
I stuffed them with a cotton ball size bit of fiberfill. The combs and tails are loops of yarn and the beak is a crochet chain of five stitches. The eyes are french knots.
I did all the embellishing before sewing them up.

I have purchased a new book. I love it! It is Knit A Fantasy Story by Jan Messant. I have only knit one of the patterns so far, but it seems to fit the scale of my Nativity set. I am hoping to use patterns from this set to round out my Nativity scene.
The book has Enchanted Castle, Magic Forest and Farmyard Fantasia themes.

Thank you for sharing the pictures, Ria! Seeing the cardbord center that was removed from the cone and seeing it from different angles is really helpful.

Ria made a yarn bra for her cone of yarn from my instructions. Here is what she said about it:
It works for me on the cones of cotton really well. I just removed the cardboard cone center and the yarn feeds from the inside of the yarn. No more roly poly cones!
Thanks for the pictures, Ria!

I have finished a Wise man. My Wise Men will be different nationalities.
Again a clever, easy to knit, takes forever to sew it together pattern. All the little details make it cute.
I did deviate from the standard Wise Man pattern and made the coat more like the other figures. I also put a little stuffing up his sleeves.
I solved the problem with the bases. I am using sheet styrofoam with a layer of craft foam on the side that is seen. I am using the lid from the Pam kitchen spray like a cookie cutter. Lay two strands of thin yarn in the shape of an X on the section of foam you want to cut. Center the Pam lid over the X and push down, twisting the lid back and forth a little as you go. You may need to pick up the sheet and work from the bottom as well to make sure it cuts all the way through. To get the styrofoam out of the lid, hold all four yarn emds and pull straight down and it should pop right out. Much easier than cutting cardboard circles, but the little styrofoam bits are annoying so have the vacuum cleaner handy.
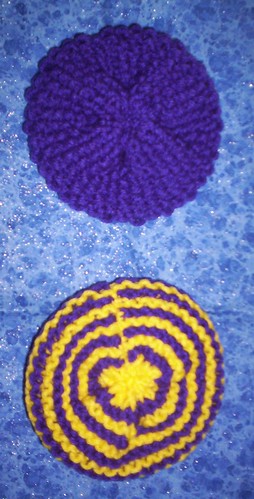
I could not resist :) I had to make more Scrubbles!
The top one is seed stitch. If you make one in seed stitch do the increase row as k1, then kfb for the rest of the stitches to give you a count of 39. Then you can k1, p1 on every row without having to think about it.
The bottom one is garter stitch in two colors. Do the cast on row and the increase row with color one and the two rows with color two, two rows with color one, etc. Finish with two rows of color one, then the decrease row also with color one. Carry the unused yarn up the side and don't cut till the end.
I did a less than excellent job of seaming this one. I probably should have seamed using both colors.
I hope to see pictures of Scrubbles you have made.

I took a break from the Nativity set to knit up some Scrubbles.
The pattern is my own and quite easy to do.
Scrubbles
Cast on twenty stitches with acrylic yarn. (these are for scrubbing and rather thick so the acrylic is the better fiber choice as cotton would never get dry)
Knit in the front and back of each stitch to make forty stitches.
Knit using desired stitch pattern till piece is four inches long.
Knit two stitches together across to make twenty stitches.
Cut yarn, leaving a good twelve inches of tail.
Thread a needle with the tail and pass it through all twenty stitches on the knitting needle. Cinch it up tight. I make a knot here so the cinched stitches don't slip.
Still using the tail yarn, sew up the side seam. I then tie a knot to the cast on tail.
thread the needle and yarn through the cast on stitches and pull up tight. Tie to cast on tail again.
Poke needle all the way through the middle till it comes out the other side. Move it over a stitch or so and theread it back to the side it started on. Tie it again to the cast on tail and weave in both ends.
This makes a round scrubbie about four inches across for scrubbing up the stuck on stuff on your dishes. It is not a washcloth and is not meant to be absorbent.
The Scrubbles on top was made doing garter stitch.
The Scrubbles on the bottom was made using the stitch pattern Tina recently used in a contest on the Love2KnitDishcloths Yahoo group and is k1, k2tog, yo across, ending k1.
Experiment with different stitch patterns and share what you come up with.

Now the donkey is finished, although not exactly like the pattern. It looked so plain with just the gray so I decided to add in the cross on the donkey's back. Legend has it that the donkey did not have this cross till the crucifixation.
I also did just the first 11 rows of the tail and then tied on a black tassel for the tail.
I did not use any support inside the legs and the donkey is able to stand just fine. I made a mistake sewing on the legs. I sewed the front legs on first, but discovered as I was weaving in the last end on the second one that I had actually sewed the back legs on the front. To make them proportionately the same as the pattern I cast on 16 stitches and knit 14 rows instead of 12. For the rest of the increases and descreases I followed the same formula as the original back leg. I also attached the a bit differently. I stuffed the leg almost to the top and then flattened the top and sewed it against the side of the donkey instead of directly to the bottom.
He was a fun knit although LOTS of sewing.

I finished one of my figures of Mary. I used a plastic lid from a jar of peanut butter for the base.
I am doing the necks of my figures a little differently than the directions. The directions say to wrap yarn around and around to cover the neck. I do a gather at both ends of the neck and tighten. The necks are too big if something is not done.
I also stuff the upper arms of the figures from shoulder to elbow.
I sewed Mary's hands to each other at the tips instead of stitching them to the skirt. This makes it easier for the baby to be inserted or removed from her arms. The baby can either be held by her or removed and placed in the manger.
I have gone with unconventional colors for the eyes and hair and have made them blue and red.
Again there was a LOT of sewing in the finishing of the piece, but it was so worth it!

This is a shepherd from Jean Greenhowe's Christmas Special. I am so pleased with the way he turned out :)
I have posted the sheep before, from the same book.
The figures require a flat base to go in the bottom. The suggested base is cardboard circles cut out, stacked and glued. While searching for a circle of the right size to trace I discovered that the cap from my non-stick spray, (think Pam, except for a generic brand), was the exact right size and I used the whole cap inside the figure. I did cut a circle of craft foam to hide the plastic cap. It worked very well. Now I have to use up more spray as there are still a lot of figures to make.
I did not make his staff yet as the book calls for a drinking straw 1/8" in diameter. I don't have any that thin and need to come up with something else to use. Maybe I can stick a couple of coffee stirrers together. One would not be long enough.
I thoroughly enjoyed making this project although there is a lot of sewing. The seams don't show from the front and later ones should be better as I am getting a lot of practice.

These are mostly from the Jean Greenhowe pattern. I did make some changes. For the baby with hair I knit the hair on the last two rows of the head instead of stitching it on after. I also threaded the ends to the outside after weaving them in on the inside and cut them off sticking out to give a more three dimensional look to the hair. The second baby has no hair. I added arms also. The baby on the left has arms made by casting on ten stitches, knitting stockinette for five rows then binding off. I rolled the resulting piece and stitched along the edge and sewed it on. Baby two has arms made by casting on eight stitches for four rows and then the same way. Baby one also has the hint of legs in his bunting made by stitching loosely front to back through all layers of the piece for three stitches.
I used Jean's manger pattern, but did not like the way my babies looked in it so I rolled the edge to the outside and stitched it in place about halway down the side on the outside. I also wanted hairier hay so used fun fur in champagne color. I cast on fifteen stitches for thirty rows. For baby one I knit the fun fur together with Yellow Simply Soft and for baby two with Bone Simply Soft. For baby one i knit the manger with two strands of Brown Simply Soft and for baby two I used a Strand of Brown and a strand of Bone together.
This is a fun knit and I have a LOT of pieces waiting to be put together.


Step 2: Find tie in middle holding it together. Untie the rope and carefully cut the tie. in this photo the tie is white.
When I came downstairs this morning, this was waiting for me from my sweet husband.
I also have a gift card for A.C. Moore and will be using it when the store opens.